HOW TO HACK BATTLEBOT TOYS
for use in Robotic Combat
|
|
|
|
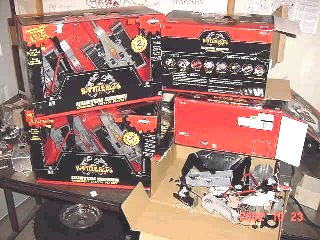
The nice thing about these toys, of which there are eight models to choose from, is that they operate on narrow band transmitters. The toy you get will either be on 27 Mhz or 49 Mhz, and you can select one of four channels (A-B-C-D) to control your bot. Basically, you can have 8 bots fighting at the same time!
The other noteworthy fact, is that all of these toys use the same basic platform, with small differences in the wheels, to which they add a bunch of plastic to make it look like one of the real Battlebots. Of course, this is the first thing you throw away. When you get done you'll have a basic platform that weighs 7.1 ounces (without batteries) that you can customize and make unique from all others. If you are trying for an Sozbots legal antweight, make sure you don't go over 16 ounces (1 pound).
There are several modifications that need to be made to the basic platform, to make it work once you bypass the impact sensor built into the unit. There are other modifications that can be done to improve overall performance as well.
|
to Enlarge 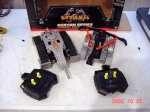
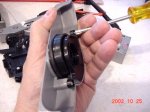
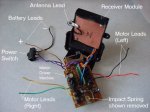
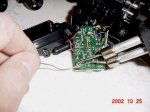
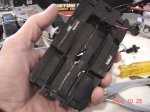
| OK, you've put your hands on a Battlebot toy and you are ready to start hacking! The hardest part is getting them out of the box. We're going to work on the 'Son of Whyachi' toy for this series. It came bundled with 'DoAll', and one is on 27Mhz the other is 49 Mhz. Try to balance your stable with both frequencies for maximum utility. We found one toy, labeled for 27 Mhz that was really 49 Mhz, so check these things out, and re-label them if necessary. |
|---|---|
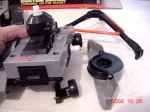
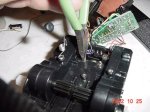
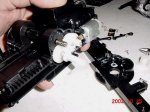
| 1) Grab the weapon rotor and the left and right wheel covers, and pop them off their hex shafts with a firm tug. |
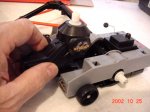
| 2) Now pull the weapon gearbox straight out of the main chassis module. Its a snug snap fit. If you try and run your bot at this point, it won't work, as there is an interlock that keeps it from going unless this is in place. We'll bypass that in a bit. |
| 3) With the weapon gearbox out of the way, you should be able to pull off the rest of the decorative covers and idler wheels |
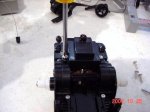
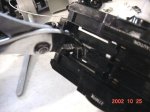
| 4) OK! Now you've got the basic platform, without the wheels. |
| 5) Speaking of wheels, some of these toys, like S.O.W. have their wheels inside a cover. You need to unscrew the cover to get your wheel out. Keep the plastite screws in your spares kit, in case you need one later. |
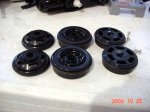
| 6) The wheels vary from toy to toy, and some have different diameters. My favorite wheel comes off the Dr. Inferno toy, as it is conical in shape and makes it easy to adapt to other types of wheels used on R/C cars and airplanes. You can take the rubber O-ring off the wheels at this time and paint them for a custom look. |
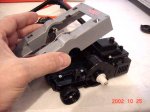
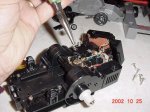
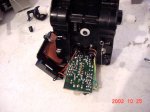
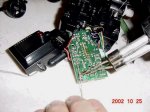
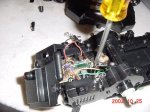
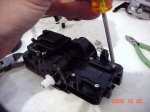
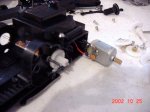
| 7) Nitty-gritty time. Now we hack into the chassis! Remove the two screws that hold the receiver module onto the chassis. These two are different than all the other screws you'll run across, so remember what they look like. |
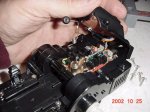
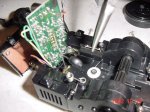
| 8) Unhook the receiver module from its catch on the chassis and rotate it up a bit, gently and pulling on the wires to get some slack. |
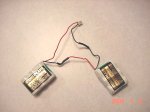
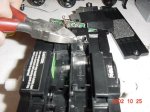
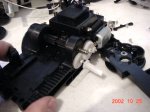
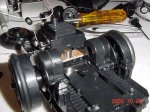
| 9) Here's a picture of all the electronics removed from the chassis, just for clarity. |
|
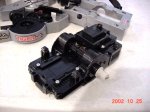
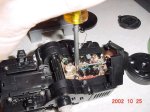
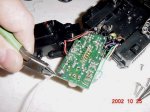
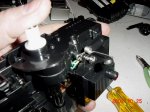
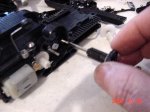
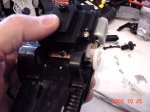
10) Using a pair of needle nose pliers, grab the spring inside the oval shaped tube and pull it all the way out until it breaks off. This is actually an impact switch which shuts the bot down in a collision, so when you play with them as toys, you can determine a winner. You DON'T want this feature! |
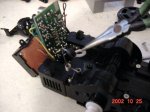
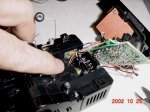
| 11) Remove the two screws holding down the motor driver card and set them aside. |
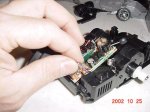
| 12) Untwist the purple and brown wires and any other that are dressed, as we need to get as much slack here as possible. |
| 13) Gently lift and rotate the card toward the back to expose the bottom of it |

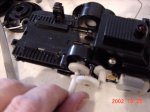
| 14) Under here you'll see slider interlock and torsion spring that keeps the bot from running when the weapon gearbox is removed. |
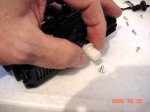
| 15) Using some needle nose pliers remove the slider... |
| 16) Followed by the white torsion spring retaining washer... |
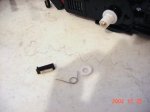
| 17) And remove the torsion spring. You can discard these parts. |
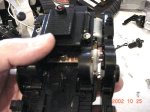
| 18) Now find the two rectangular pads that the slider makes contact with on the bottom of the motor driver card. Using a soldering iron or soldering gun, melt a small mound of solder on both pads. |
| 19) Strip some insulation off a light gauge wire and pre-tin the wire with solder (you can use the wire that held down the toy in the box if you wish). Place one end of the wire on the innermost solder mound and with the soldering gun, press the end of the wire into the mound which solders it to the pad. I do it this way as it is easier when you only have two hands. |
| 20) Solder the wire into the other pad the same way, then snip the excess with a pair of side cutters. |
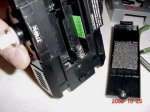
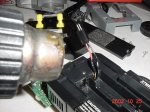
| 21) Take a look at the other side of the chassis and remove the battery cover. If you are going to use regular AA batteries ( 6V) or their equivelant in Ni-Cads (4.8V), then jump ahead to #27. If you are going to relocate your batteries or use a different size, continue here: |
| 22) Unsolder the brown and black wires from the battery box terminals, which are under the motor driver card. Lift up the bent tabs that the wires were attached to. |

| 23) Using a blunt screwdriver, forcibly press on the tabs, which pushes them out the far side. |
| 24) Pry the terminals out the rest of the way to remove them from the plastic chassis body. Pull the terminals out of the other end as well. |
| 25) Thread the brown and black battery wires through one of the holes vacated by the battery terminals. |
| 26) Splice in a small cable and connector with male pins, like are on the Futaba or Hi-tec radio cables, or what would be compatible to small cell-phone batteries (which are female). |
| 27) Carefully position the motor driver card back into the chassis and put both of the screws back in. Keep in mind, you are screwing into plastic so just turn the screws until they are snug. |
| 28) Position the receiver module back on top of the chassis, being careful not to pinch any wires. Also check to make sure the little ring terminal, which is the antenna wire, is lined up with the antenna loop and screw hole in the receiver cover. |
| 29) At this time remove the four screws and two plastic snap springs, that are used to lock in the toy's weapon gearbox. You don't need these any longer. |

| 30) Remove the left and right wheels hubs, by holding the hex shaped hub with your fingers and removing the screws with a driver.. |
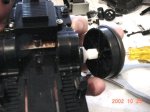
| 31) Remove the 5 screws that hold the left drive gearbox cover on. |
| 32) Study the gear stackup and arrangement. Our task here is to get rid of the black gears and their associate shaft from both sides. These two gears are used to power the lame weapon that comes with the toys. It eats horsepower from the motors and does nothing for you in competition. |
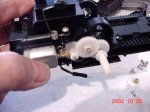
| 33) Locate and remove the two white gears. Make sure you don't lose any of the little bushings on the wheel shaft, as its only held on with sticky grease. |

| 34) Slide the black gear, with its embedded spring off its shaft. |
| 35) Do the same on the other side. |
| 36) Here's what it should look like with the weapon gears out and the drive gears back in place. (Sorry about the blurry pictures. My digital camera isn't very good for close-ups) |
| 37) If you want you can pop out the motor to see how it fits in. Sometimes, the little Chinese kids assembling these toys do not make a very good solder joint so you may have to re-attach wires at a later date. |
| 38) Put the idler gear onto its shaft, with the small spur gear toward the chassis. |
| 39) Place the wheel axle into the pocket of the chassis, so that the gear is under the idler gear. There is a small plastic piece on the end of the axle that rests into a pocket on the chassis. Make sure this is still on the axle and is positioned correctly. |

| 40) We're ready to re-assemble the gearbox covers, but this would be a good time to paint the covers for that custom and snazzy look. Remove the white bushing from the cover before painting. Remember how it fits back in! |
| 41) Gently position the cover so it fits over the axle and shafts and press it into place. |
| 42) Place the hex shaped wheel hubs on the hex shaped axles and put the screw back in, snug, not tight! |
| 43) If you opted for a custom battery pack and were going to use the old battery cavity to mount it in, you might want to break off the webs that help position the AA, Use side cutters and combination pliers to achieve this. |
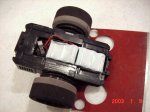
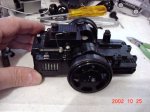
| 44) This is what it looks like all cleaned up with the new battery connector. |
| 45) Snap the wheels back onto the axles |
| 46) See the opening where the weapon gears and weapon gearbox left the electronics exposed? Put some electricians's tape over the openings to keep debris from entering. |
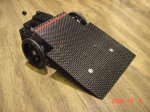
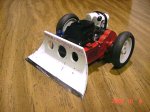
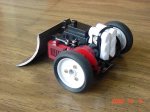
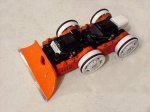
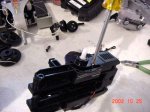
| Here's your finished platform. You should be able to drive it around now. Now its ready to add your secret weapons (wedges are easiest) and other personalized stuff. You can add 8.9 ounces to it and still be an antweight. As it sites in the picture, the bot will rest on its rear as it is heavier on that side of the wheel at this point. As you add wedges and body parts to it the weight will cause the front to fall forward, which is what you want - I think - maybe. |
|
| |
|
REVERSING THE DIRECTION OF THE BOT
1) Mark the motors so you know which wire lead went to which motor terminal (Green and Yellow, Red and Black) 2) You'll need to lift up the motor driver card again to free up the wires to get as much slack as possible. 3) Unsolder the wires from each motors. 4) Cross the red/black and green/yellow wires over to the opposite sides of the chassis so the ends are accessable for re-soldering. Route the wires so that you run the shortest distance and have the maximum amount of wire sticking out. 5) Screw the motor driver card back down. This helps give you a few more millimeters of wire to play with during re-soldering. 6) Resolder the ends of the wires to same place on the motors that you took them off from (remember you marked the motors!). 7) Re-position the motors back into the chassis. Be careful to get that cylindrical capacitor into the cavity of the chassis and not pinching wires. 8) Re-assemble everything and the front should now be the rear, and the rear the front.
| |
|
REPLACING THE BATTERIES
You may have noticed that Blizzard and a couple other of our Battlebot toy-based bots have this white caboose on the back end. those are NiCad batteries that we placed there. The BB toys are set up for four 1.5V alkaline AA batteries (4 X 1.5=6V). We were going through a lot of those when we first got these things. If you put AA size rechargeable NiCADS in them they run slower as those are only 1.2 V, or 4.8V total. I couldn't see buying all those batteries so I tried 6 NiCad cells and everything seemed to work fine. It makes them very peppy and did not seem to faze the receiver and motor drivers any at all. After building 5 of these I was later talking to a young fellow at MechWars that said he ran one at 9.6V, or 8 cells. I tried that on Tandem in one of the early matches at Critter Crunch, but it was so fast and squirrelly I couldn't control it. And this is on an 8 foot square platform. We were screaming off the relatively large sumo style platform when we didn't want to. Keep in mind these BB toys don't have dynamic braking like our big bots do. Sozbots is 5' square, and the Las Vegas Street Fight is 4' square. These are tight places. Tandem was so uncontrollable I lost the first match, and changed back to 7.2V. It then went on to get a second place overall. | |
|
MAKING A 7.2V BATTERY PACK
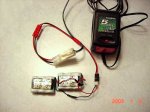
You can buy a Radio Shack charger that will charge either a 7.2V or 9.6V, Nicad or NiMH battery for about $10. It says its a 5 hour charger, but that is for larger batteries. These little ones will charge in about an hour. Modify the cable end to put a male Futaba lead on it so that the two pins can be inserted into the battery connector. We use an Astroflight 112D for the antweights as well as our bigger 12 to 30 pound bots, but the radio shack one is handy when there are a lot of litte ones to charge. Just watch them carefully so the batteries don't get too hot.
| |