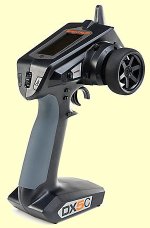
 Twin-stick transmitters have their spring-loaded center point at at the middle of the stick axis motion. At this rest point the transmitter sends an electronic signal that robot bi-directional motor speed controllers interpret as the neutral point where the motor should be stopped.
Pistol grip transmitters are different. Their spring-loaded throttle trigger 'rest point' is typically off-set with about 70% of motion devoted to pulling back for forward motion and 30% to pushing forward to signal reverse travel. This gives greater range and sensitivity to forward throttle direction for R/C cars that only use reverse to back away from the rock they just ran into. At this rest point the transmitter sends an electronic signal that robot speed controllers by default interpret as a motion command, and the robot backs up at 40% throttle!
We can fix this by calibrating to set neutral to the actual spring-center throttle position. The following is a post from Team Run Amok's Ask Aaron combat robot Q&A page that walks a builder with a 'FlySky FS-GT3B' radio and a 'Scorpion Mini' ESC thru the set-up process. Check the manual to find the calibration process specific to your ESC.
 Q: I'm trying to set up a Fly Sky FS-GT3B pistol grip transmitter with a Scorpion Mini ESC. I got the receiver to bind, but controls are kinda 'haywire'. When I power on, the motors just start running. Any help would be greatly appreciated, thanks!
A: Bi-directional motor controllers for robots expect the 'neutral' signal from the radio to be in the middle of the signal range. Pistol grip transmitters typically have the spring mechanism for the throttle trigger set off-center to give a longer throw with greater precision in the forward direction. R/C car controllers are calibrated to expect that offset, but your robot ESC interprets that offset signal as: back up at 40% throttle.
Fortunately, we can correct that misinterpretation by recalibrating the ESC to recognize the new 'center point'. You may want to disconnect the motors from the Scorpion Mini during calibration to prevent run-away:
- Turn on transmitter, remove any transmitter trims and leave the wheel and throttle trigger spring 'centered'.
- Power up the Scorpion Mini and receiver.
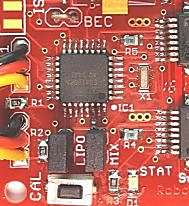
- Press the ESC 'calibrate' button. When the 'Status' LED goes out, release the button.
- Move the transmitter throttle and steering controls thru their full range (forward/back and left/right) several times.
- Return controls to spring-center.
- Press and release the 'calibrate' button again. The 'Status' LED will light up.
- Verify calibration: both motor LEDs on the controller board should be off with the transmitter controls at rest.
- Power everything down -- your ESC will retain these settings in memory.
Next we'll set up the channel mixing needed to get correct throttle and steering response from the pistol-grip transmitter. The setup is different than 'transmitter-side' channel mixing with a full-featured twin-stick radio. The FlySky FS-GT3B has no mixing capability, so we'll 'make do' with the Scorpion Mini's limited on-board mixing:
- The Scorpion 'steering' lead plugs into the Fly Sky receiver channel port #1.
- The Scorpion 'throttle' lead plugs into Fly Sky receiver channel port #2.
Throttle Test Power up the transmitter and robot, then pull the transmitter throttle trigger back a little -- a 'forward throttle' command.
- If the robot moves forward: good! Skip down to the Turning Test.
- If the robot moves backward: select REV from the transmitter setup screen and reverse channel 2.
- If the robot spins to the left: reverse the motor lead connections for the left motor.
- If the robot spins to the right: reverse the motor lead connections for the right motor.
Note If your 'bot has multiple motors on each side of the 'bot and not all of those motors are turning in the same direction, reverse the motor power leads to the ESC for any motor(s) spinning the wrong direction.
Turning Test Turn the transmitter wheel a little to the right -- a 'spin right' command.
- If the robot spins right: you're done!
- If the robot spins left: select REV from the transmitter setup screen and reverse channel 1.
That should do it. There are additional tweaks available from the transmitter's Dual Rate (D/R), Adjustable Travel Volume (E. POINT), and Exponential Response (EXP) adjustments that may make your robot easier to operate. You can learn about them here, then check your Fly Sky manual for instructions on implementing them on your transmitter.
Q: Followed your instructions and, success! I can't thank you enough! This, paired with a 4s battery gives me a lot more power and control than before.
A: You're very welcome. Now get out there and beat up some robots!
See also: Combat Robot Radio Systems - what functions do you actually need?
 Run Amok Combat Robotics
 Q: I'm trying to set up a Fly Sky FS-GT3B pistol grip transmitter with a Scorpion Mini ESC. I got the receiver to bind, but controls are kinda 'haywire'. When I power on, the motors just start running. Any help would be greatly appreciated, thanks!
 Twin-stick transmitters have their spring-loaded center point at at the middle of the stick axis motion. At this rest point the transmitter sends an electronic signal that robot bi-directional motor speed controllers interpret as the neutral point where the motor should be stopped.
