 Run Amok Combat Robotics
Combat Robot Radio Systems - what functions do you actually need?
Privacy Policy
 As a robot builder you will learn very quickly that hobby R/C systems are NOT made to control combat robots. Most radio gear is sold for model helicopters, drones, and fixed-wing aircraft; the user manuals are written in aircraft jargon. Fortunately the features found on advanced radio systems can meet the needs of any combat robot – if you can decipher the terminology to figure out which of the dozens of available features are needed or useful. Deciphering the aircraft language isn’t easy:
This guide lists the R/C system functions and features that typical combat robot designs either require or will find useful. Do not pay extra for features not listed here unless you have a very specific need. THE BASICS
Listed below are features that you can put to good use, along with brief descriptions of how each is used. I have placed the features into three categories depicted by a number of 'stars':
FAILSAFE ***
Combat robot rules generally require that larger robots and any robot with an active weapon must ‘failsafe’ on loss of signal from your transmitter: it must quickly stop moving and shut down active weapons. Unless you plan to spend your whole robot career building insect class wedges and rammers, you must have a radio system with proper failsafe response.
A READABLE MANUAL **
Radio systems that claim ‘failsafe’ capability may actually do one of several things on loss of the receiver signal:
Some receivers offer a pre-set position failsafe active only for the throttle channel (channel 3) while the other channels switch off their output signal. This is awkward. You will most likely want this failsafe on your weapon, and this forces placement of weapon control on a gimbaled stick axis.
Some radio systems will give you a choice of failsafe type on each of the channels. This is highly desirable as it offers flexibility in incorporating various weapon designs.
Some very inexpensive radio systems have a large selection of features, but have user manuals that were written in Chinese and very poorly translated. Here’s an actual example:
CHANNEL MIXING **
If you can’t read the manual, you’re going to get extremely frustrated trying to setup your radio for best performance. Download the manual before you buy the radio. If you can’t make sense of it, consider buying a different radio.
Combat robots commonly have two motor controllers: one each for the left and right sides of the robot. This allows the robot to turn by running the two sides of the robot drive at different speeds and/or directions. Most drivers have a strong preference to have both motor controllers respond together to move the robot forward and backward under the control of a single control stick axis, and to have both controllers respond in opposite directions to turn the robot under the control of a second stick axis. This is done by 'Channel Mixing'.
MODEL MEMORY **
There are many available types of channel mixing. Look for a radio system with at least ‘Elevon’ mixing (AKA ‘Delta Wing’). The Elevon mix will allow you to steer with the horizontal axis of the right-hand stick and control forward/reverse throttle with the vertical axis of either the right stick (Mode 2) or left stick (Mode 1). A radio that also has 'V-Tail' mixing will provide additional choices in choosing which stick axis controls which function. Mixing setup help is in 'Appendix A' to this guide (below).
If you have more than one robot you need this. Model memory allows you to save the full set-up for each robot on the transmitter and switch quickly between them. This saves time, effort, and errors when switching between robots.
SERVO REVERSING **
During the radio set-up process, you may discover that one or both of the drive train motor controllers respond in the wrong direction: the motor backs up when you command ‘forward’ – or you may discover that the toggle switch controlling your flipper weapon has the ‘down’ and ‘up’ positions reversed. You could physically reverse the motor polarity or re-plumb your pneumatics – but with this feature, you can simply instruct the transmitter to reverse the signal it sends to the receiver. Very handy, and almost every hobby grade radio has this feature.
TRIM and SUB TRIM **
Another set of features that will save you lots of time in set-up. 'Trim' sets the center point for the transmitter controls, and 'Sub Trim' sets the center point for each of the receiver outputs. You need both because with ‘Channel Mixing’ (see below) one transmitter input can affect multiple receiver outputs. Again, these are very common features.
LCD DISPLAY PANEL **
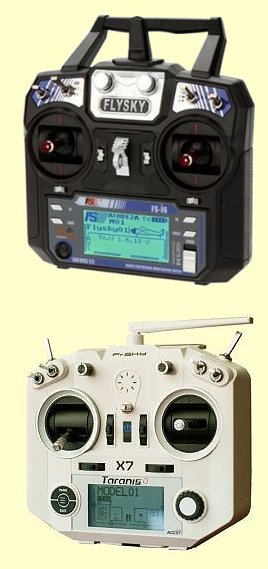
A transmitter with the features you want for combat robotics will greatly benefit from an display screen to assist in setting up and adjusting those features. Transmitters without display screens either have very limited adjustability options or require that you to plug the transmitter into a computer to change feature settings. Pay a little more and upgrade to a flexible system with a display screen.
DUAL RATES **
This function allows you to choose between two differing amounts of receiver response to maximum transmitter stick deflection with the flip of a toggle switch. Commonly used to limit steering response to prevent wild gyrations in adrenaline-fueled combat, but still allow an instant change to a rapid steering spin rate for special situations.
ADJUSTABLE THROTTLE VOLUME * / **
With Elevon mixing, try setting channel 1 (aileron) dual rates to 50% and 100%. Adjust as needed to provide proper steering response. Note that some cheap radios have a single ‘fixed’ dual rate setting that does not allow adjustment -- not a good choice for combat.
Different manufacturers may call this ‘ATV’, ‘End Point Adjust’, or ‘Travel Adjust’. If you don’t have ‘Dual Rates’, then this becomes a ‘need’ rather than a ‘want’ feature. If you have adjustable dual rates, leave this alone and set a dual rate instead.
EXPONENTIAL RESPONSE *
Too much steering sensitivity will make your robot very difficult to control in combat. You’ve probably seen video of robots that keep overshooting their steering corrections and either spin out or just never get pointed in the right direction. That may not be poor driving – just poor radio setup. Start at about 50% response for the steering channel and experiment.
Another adjustment to make steering control a little smoother. Also called ‘Exponential Rate’, this function is commonly used to decrease steering sensitivity near the center point to allow finer control while still allowing full range of motion. IMHO, this function is not as effective as setting an ATV or Dual Rate, but it can improve the ‘feel’ of the robot control. Consult the radio manual for setting instructions.
MODE SWITCH *
There are two common layouts for the control stick assignments:
MULTI PROTOCOL *
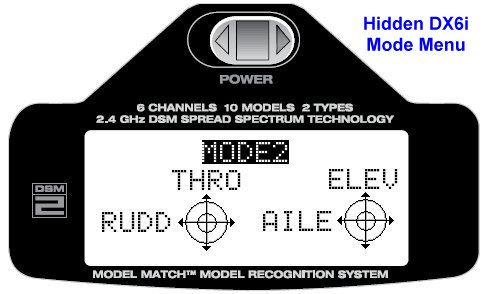
Most manufacturers mention this option in the User Manual. Oddly, the Spektrum DX6i transmitter can switch modes, but the menu screen is both well hidden and undocumented. The secret is revealed in 'Appendix B' to this guide (below). Note: the throttle (channel 3) stick is usually NOT spring centered like the other stick axis. This makes sense for an airplane or helicopter, but is annoying for a robot. You may be able to purchase the pieces needed to convert the throttle axis to spring centered from the manufacturer, or you can just transfer the spring mechanism from one stick axis to another if you need a particular axis centered
Transmitters from different manufacturers use differing 'protocols' to establish a connection and send information to the receiver. The transmitter and receiver must be able to communicate using the same protocol. Common protocols include:
Some transmitters offer 'Multi Protocol' capability, either built-in or via a plug-in module. This can be handy in the long term if your favorite receiver gos out of production (common) and the best new choice is a differing protocol. Those are pretty much the only functions you’ll need or use for a combat robot. Advanced radio systems offer dozens of highly specialized functions that I have not listed here. If you are sufficiently advanced to design a robot that needs any of those other R/C functions, you probably already know what they do and why you need them.
Combat Robot Elevon Mixing
Setting up channel mixing can be frustrating. You enable mixing and plug everything in only to discover that the robot is not responding correctly: it backs up when you command a turn and spins to the left when you try to go forward. Where do you go from there?
Throttle Test Power up the robot and push the right stick forward a little (forward throttle command).
Note: if your 'bot has multiple motors on each side of the 'bot and wheels on the same side of the robot are turning in opposite directions, reverse the motor leads to the ESC for any motor(s) spinning the wrong direction.
Turning Test Move the right stick a little to the right (spin right command):
Turning response will likely be too sensitive for combat. Scroll up to the above sections on Dual Rates, Throttle Volume, and Exponential Response in the main section of this guide to adjust control sensitivity.
Solution: You have either all mixing turned off, or BOTH transmitter mixing and speed controller mixing turned on. Adjust so one and only one mixer is active.
Many computerized transmitters have a menu option to swap stick assignment modes. The DX6i has one, but it's undocumented and really well hidden. Here's how you find it:
Please send notes for improvement, correction, or clarification to joerger@toast.net.
Copyright 2012 Mark Joerger, Team Run Amok
More robot help: |


