Run Amok Combat Robotics
Notes on using the 4QD PRO-120 speed controller for Robotics
Privacy Policy
|
The 4QD motor controllers are no longer widely used in combat robots. Many of the links on the page are outdated. I keep this page up largely as a reference for maintaining my own vintage heavyweight combat robots: Robot Wars competitor The Gap and Robotica champion Run Amok. The controllers took a good deal of abuse and never faltered. The current 4QD version of this controller is the upgraded PRO-150 which is electrically and mechanically interchangeable with the Pro-120 in most applications.
The 4QD company in England makes a broad range of speed controllers for small electric powered vehicles. I've never used anything but the 4QD PRO-120 controllers in my combat robots, and they have proved themselves reliable and relatively inexpensive to purchase and to operate. They are not, however, robot-friendly 'plug-and-play' devices. Although popular in Europe for robotics, their original design for controlling golf carts required a number of ignition switch, power-up 'fail safe', and other control features that get in the way of convenient use in a combat robot. There is extensive documentation provided by the manufacturer at their website, but it is written in Techno-British and contradicts itself in a few places. A good place to start, should you wish to retrace my steps, is www.4qd.co.uk/prod/pro.html.
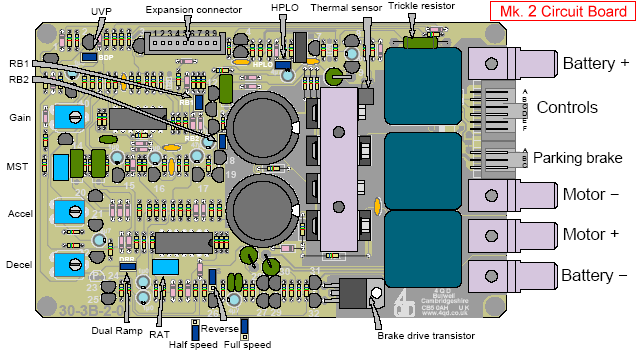
I thought it might be of use to 'roboteers' if I boiled down the information I have acquired through long hours of search and experimentation into a simple manuscript. Please note that the modifications described here have worked for me but that they are provided on a 'try at your own risk' basis. Best luck to you. The full manual for the PRO-120 may be downloaded in PDF format: www.4qd.co.uk/manuals/. Note that 4QD is currently supplying a Mark 2 version of the Pro-120 controller. Specifications are unchanged, but there are some added user adjustments and selection options. There are also minor changes to the circuit board. The full manual for the Mk.2 version is at: www.4qd.co.uk/manuals/. Differences in setup options will be noted in red in the text below. Power Handling Capacity: The PRO-120 has a heat sensing circuit that will cut back the power output of the controller if the temperature of the internal heat sink exceeds 95 degrees centigrade, thereby protecting the controller from overloading. The factory tests these units on very high amperage stalled loads and believes that they are essentially immune from overloading if properly connected -- although they may not deliver the amps required for sustained high torque output on very large motors. Without additional heat sinking, the bare PRO-120 board will give over 110 amps for a full minute before the thermal circuit cuts back the power. Addition of the available base plate or other heat sink capacity will extend this figure. I have used the 24-volt version of the controller with motors rated up to 210 amps stall current with very good results, and have found that the controller will provide ample power to 'cook' a Bosch 750 motor rated at 160 amps stall current. Purchase Options: Versions of the PRO-120 are available for operation on 12, 24, 36, or 48 volts. The controller may be converted from one voltage rating to another should the need arise: see www.4qd.co.uk/serv/prov.html for conversion details. Other purchase options include an aluminum heat sink base plate and a plastic cover to keep out stray moisture and debris (yes, do buy these). Dimensions of the controller with base and cover: 7.75" long, 4.75" wide, and about 2" thick. Price in England is around $230 (plus VAT in the UK) with heat sink base and protective cover. The controllers may be purchased directly through 4QD (www.4qd.co.uk) or thru Technobots (www.technobots.co.uk). 4QD will ship direct to the USA. Robot Marketplace www.robotcombat.com/marketplace_4QD.html in the US offers the PRO-120 for about $300 with heat sink base and protective cover. R/C Interface: There is no place to simply plug-in a lead from your R/C receiver. The controller is designed to have a potentiometer attached to a hand or foot throttle on the vehicle that would be operated by the driver. For remote control operation you could attach a potentiometer to a standard servo, but you would also have to close a contact on the controller in order to switch from forward to reverse. It can (and has) been done, but I can't recommend it! Other choices:
Setup options: There are two modifications to the controller that I recommend to make it more robot friendly: Half-speed reverse - As supplied there is a jumper on the board set such that the maximum reverse speed is one-half the forward speed. Although this might be useful for a golf cart, it simply will not do for robot use! Move the jumper (at the lower edge of the diagram) from the lower and middle pins up to the upper and middle pins to enable full speed reverse. Ignition sequence - There is a specific startup 'sequence' required for the controller to operate properly: battery power is applied to the controller, followed by turning the 'ignition switch' on. If the ignition switch is left on when the power link is inserted, no power flows. This is designed to prevent golf carts from accidentally 'taking off' should the battery pack be plugged in with the ignition switch left on. Interestingly, this feature works properly in some controllers, intermittently in some, and not at all in others. Since there is another fail-safe covering this same situation (see High Pedal lock-out below), I suggest disabling this feature by soldering a two-watt 100 ohm resistor in parallel with the 'Trickle Resistor' shown along the upper edge of the diagram. The 4QD factory suggests placing a suitable diode (about 2 amps) in series with this added resistor to maintain reverse polarity protection. There are other modifications discussed in the controller manual you may wish to know about for the sake of completeness: High Pedal lock-out - If the removable power link is plugged in with the throttle at anything but zero, this feature holds the power off to prevent the robot from taking off unexpectedly. You may disable this feature on the Mk.1 version of the circuit board by cutting a lead of the resistor labeled 'Rhplo' (upper edge of the diagram) - but I suggest leaving this feature active for safety reasons. A jumper marked HPLO on the Mk.2 version of the controller board may be removed to disable the high pedal lockout. Regenerative Braking and Dual Ramp - The Mk.2 version of the controller offers the option to disable regenerative braking by removing three jumpers (RB1, RB2, and Dual Ramp) from the circuit board. This would be undesireable for combat robotics and incompatable with R/C interfaces. Leave these jumpers in place. Under Voltage Protection / Battery Discharge Protection - As supplied, the Pro-120 monitors battery voltage at the controller terminals and decreases current output if it falls below 15 volts to protect the battery from over discharge. The Mk.2 version of the board offers the option to disable this feature by adding a jumper in the position marked UVP (or possibly BDP) on the circuit board. Because the voltage threshold is so low, it is unlikely that this feature will ever effect the performance of your robot -- but go ahead and disable this feature to make sure you can pull all the juice from your battery should you need to. I've seen teams forget to fully recharge their battery before a match! 
Set-up adjustments: There are three adjustable potentiometers on the circuit board labeled 'Gain', 'Accel', and 'Decel'. These pots can be reached from either side of the board with a small screwdriver, thanks to a handy access hole in the circuit board. These adjustments are required to match the controller to your R/C interface and your motor response requirements. Gain: This adjustment matches the maximum output of the controller to the maximum deflection on your R/C stick. Set-up is simple:
Accel and Decel: The 4QD controllers have both acceleration and deceleration 'ramping'. This feature determines just how quickly the controller can go from zero output to full output and back again. It gives a smoother ride to golf carts, preventing neck-snapping starts and stops. The 'ramps' may be set to between 0.33 seconds and 7.0 seconds via the potentiometers on the board. Generally, both pots will be set to the minimum ramping for best response from a robot. If you do get excessive wheelspin on hard acceleration, you might want to experiment with increasing the ramping on the Accel pot. There is a special 'Robot Wars' version of the Pro-120 with decreased ramping times (0.03 to 0.7 seconds). Availability of this special version of the controller is unknown. Modification of the standard circuit board to reduce ramping times is possible, but I have not persued this as I have found the 0.33 second setting to be satisfactory.Additional Mk.2 Adjustments: Dead Band: The center 'neutral' region of the R/C stick where the controller is unresponsive is called the 'dead band'. The Mk.2 version of the Pro-120 has a narrower dead band than earlier versions and should be excellent as supplied. The factory advises against making changes to the dead band, and so do I -- however, two adjustments are possible on the Mk.2 version of the circuit board:
Modulation Start Threshold: Think twice before tinkering with this. The direction relays set by RAT are set at the factory to 'click in' before power is applied to the motor outputs to prevent relay contact arcing. Adjustments to the MST potentiometer control how far from neutral the R/C stick must be moved before power is applied to the motor outputs. Improper adjustment of the MST pot can result in power flowing prior to direction relay engagement with resulting wear and possible sticking of the relay contacts. Adjust the MST with use of a voltmeter to monitor the motor outputs to assure power is applied only after the directional relay engages. More Questions: I'll be happy to discuss the 4QD PRO-120 controller with robot builders. My email is: joerger@toast.net
|